Wednesday 31 December 2014

Happy New Year and a New Tutorial

Servus and a happy new year to all my (crafty) friends and followers out there!

By now I hope you have had a wonderful Christmas and relaxed holidays! I wish you all the best for 2015 and can't wait to see where your crafty journeys will take you this year!

It's "VonPappe Wednesday" time over at That Craft Place and I want to invite you over to check out my latest tutorial, which will show you how to create this little, vintage and shabby chic door hanger:


You'll learn how to combine some of Lisa's fab MDF and grey board elements with the lush DecoArt Chalky Finish paints, how to create some yummy crackle texture and what there is to dry brushing.


Curious now? Great. Then just follow the link to get to the post and to That Craft Place.

Hope to see you there! 
Hugs and happy crafting,
Claudia 
xxx

Monday 22 December 2014

Merry Christmas!

As I have the slight idea that this might be one of the last quiet moments until Christmas Eve, I have decided to do my Christmas wishing to all of my dear blogging friends, crafty colleagues, readers, followers and team mates now. ;)


I want to thank you all for the constant encouragement you give me by commenting and thus letting me know that my blog is a source of inspiration to you. Your comments still are what keeps me going and - most important - blogging.


Thank you also for all the inspiration to all the bloggers and online teaching folk out there! Thank you to the players over at SanDee&amelie's Steampunk Challenge blog! Thank you to the sponsors who help make this spot even more special! Thank you to my wonderful teamies! Thank you to Andy, who is taking such great care of me and the rest of the team over at DecoArt! Thank you to Laura, who is the most wonderful friend and caring challenge blog owner of all! Thank you to Kerstin, Manu, Julia and Louise for caring too! And thank you to everyone else I forgot to mention!

To all of you and everyone else who reads this post: 

Merry Christmas to you!

"One of the most glorious messes in the world is the mess created in the living room on Christmas day. Don't clean it up too quickly." ~Andy Rooney


Claudia
xxx

Saturday 20 December 2014

Three Quick X-mas Tags

Just a quick post today as I should rather do some planning and preparing for Christmas Eve! (what will you be having for Christmas Dinner? Still haven't decided yet between the roast duck or the Morrocan Chicken with the delicious spices and fruit sauce)  ;)

I made some quick 'n easy Christmas tags yesterday and they turned out well enough to be shared:


Just some stamping onto white card tags (using Tim Holtz and flonzcraft stamps) with black and green Ranger archival ink and a piece of washi tape to match the colours of the ribbon. That's it!


I wish all my crafty friends and readers out there a very Merry Christmas and joy- and peaceful holidays with your loved ones! 

Hugs and wishes,
Claudia
xxx

Thursday 18 December 2014

Flowery Meadow Canvas - a DecoArt Mixed Media Project

Servus and hi!

So great to see you stop by my little crafty corner! Today I would like to invite you over to the DecoArt Mixed Media blog so you can find my latest tutorial on how to paint a flowery meadow canvas like this:


http://www.decoart.com/mixedmediablog/project/216/flowery_meadow_canvas


Some of you might have already seen the first flowery meadow canvas I have done and posted about over HERE. And as I had such a lovely time doing it, I thought I'd share some of it with you and do a tutorial for you. Thank you by the way for all the wonderful comments on this project - as this canvas is very special to me (and hopefully one of a series of more to come) your appreciation is too. xxx

To get to the full post with a detailed materials list and stepxstep just click the above image or click HERE


Hugs and happy crafting,
Claudia 
xxx


http://decoart.com/mixedmediablog/


Sunday 14 December 2014

Short invitation

Servus and hello!

Today I would like to invite you over to my other art blog "Von Pappe", where I share my more painterly stuff.


This image shows just a part of the whole canvas (as I have done a rather wide format this time). So if you are ready to meet Bertram, the grasshopper, Pubert, the depressed mosquito and some other meadow folk, just follow the link by clicking HERE.

I would love to see you over there!

Hugs and happy crafting,
Claudia xxx

Monday 1 December 2014

Double X-mas Challenge Whopper

Servus and welcome!

Today sees the start of the final X-mas countdown as well as the start of two new challenges! Yay!

Well, honestly they are rather one and a half challenge. But I'll explain later. ;)
Are you all well in time with Christmas preparations? Or do you still have no clue what to give to your FIL this year? lol
Anyway I hope you are all enjoying the advent season, having a good glass of punch, some sweet roasted almonds, Stollen and gingerbread!

Why the "double whopper"?
Because I am on two DTs whose challenges for December start today...and over at SanDee&amelie's Steampunk Challenges we have decided to celebrate the X-mas season with you instead of doing a classical Steampunk challenge. We are well aware that most of us are busy crafting away with X-mas presents and cards, baking cookies and decorating and getting the house clean for the holidays. So Steampunk might be a bit out of focus right now... but there is still a prize to win for December (and it is a fab $25 voucher from Inspiration Emporium - so you shouldn't miss this one!). So if you want to know how to join in our celebration (and get eligible for the prize win) just click HERE to get to the challenge blog and post.

Our Creative Corner have set up a wonderful challenge for you that will take you deeper into a fabby, shabby, vintage, crafty X-mas mood (if you aren't there already ;)
"Have Yourself a Merry Little Christmas!" is the December motto and if you click HERE you get to Alison and her challenge post to learn more about the details. 

AND this is a "Double Whopper" post because I have two projects to share with you - one for the Steampunk friends and one for the lovers of Our Creative Corner.


Both are ornaments - my favourite crafting projects for this time of the year ;)
 The steampunk ornaments were made from Memory Glass, self adhesive copper foil tape and glued on metal embellishments. Papers used are from Spellbinders.


The "collector of memories" pendant was made from a sanded down facetted Maya Road ornament that was given some alcohol inks and a Tim Holtz idea-ology rub on quote.


My chunky ATC for Our Creative Corner was made from three layers of thick corrugated card which I glued together and wrapped some thin cord around before I went on with embellishing and stamping.


I had a joyful play with various designer X-mas papers (from Authentique and Kaisercraft), washi tape, buttons, distress goodness, wire and stamping some Oxford Impression images.


For the steampunk ornaments I simply spread some gilding flakes from Indigo Blu on top of the cut out papers and "sealed" them with the top glass layer. This way they got pressed and crumpled which I think looks pretty cool.


To glue the clip and the metal stars and gears in place I used E6000 which works terrific with non-porous surfaces!


The rusty bell and the other pendant were fixed to the ornaments with jump rings.

For my X-mas quote on the chunky ATC I found some very cool looking white on black letter cubes (which were originally meant for use with loom band bracelets)! The red tinsel behind them hides the "wrong" side of the "X-mas" so you can look at the ATC from both sides.


The little bunting is self-made and has a piece of glued on designer paper on the back that matches the other side's design.


Both - the chunky ATC and the Steampunk ornament - can (and will) be hanged on the X-mas tree! I especially love that the chunky ATC is so light because it is made of corrugated card. Maybe I will do some more of these... ;)


The memory glass is rather heavy. So I might have to look for a stronger branch to hang these to...by the way...I really fell in love with the Spellbinders "Ephemera Papers" from Susan Lenart Kazmer while creating my steampunk ornaments!


***

Well...that should be it for now. Oh - no!...I almost forgot: make sure you check back with SanDee&amelie's Steampunk Challenges on December 15th! There will be a special announcement that some of you might find exciting too. ;)

I hope to see you over at both - OCC and SASPC - soon! Have a joyful, relaxed and fantastic advent season and as always

hugs and happy crafting,

Claudia xxx


Generous prize sponsors for the challenges this month are:

http://www.tando-creative.blogspot.co.uk/

over at Our Creative Corner

and 

http://www.inspirationemporium.com/
  
at SanDee&amelie's Steampunk Challenges


Wednesday 26 November 2014

VonPappe Wednesday #3 - Sneak Peek

Servus!

Just a short note today...well, rather an invitation to head over to That Craft Place to see what I have created for November's "VonPappe Wednesday".

Once a month I provide That Craft Place readers and followers with an exclusive and detailed stepxstep that shows an example of what you can create with and from the stuff Lisa sells. (those who don't know her fab MDF cuts by now - I highly recommend you check them out!)

Here's a sneak peek of what I did with one of the lovely sets That Craft Place sell:


 If you are in the mood to work with acrylic paints, gesso, modelling paste, some wire and designer papers to alter something, just hop over to That Craft Place. Hope to see you there!

Hugs and happy crafting,
Claudia xxx


Friday 21 November 2014

Woodland Magic

I recently stumbled over the lovely X-cut Build-a-Scene dies from docrafts and the "Woodland" set instantly won my heart. They have various lovely scenes to build, but as I am a dedicated lover of the forest AND of toy theatres (and shadowboxes in general), I just had to have this one.


The fox is already one of the five dies of this set, but I wanted to have an owl too - so I made one myself. Oh, I can imagine various animals in this enchanted woodland! But for a start I decided to stick to the fox and just add the owl and put the main focus on drawing on the die cut shapes to create an illustration kind of look.


The owl was fussy cut freehand and then painted with acrylics, a white sharpie and a black Faber Castell PITT artist pen (as was the whole forest).


My fox was done the same way and then glued to the layer I wanted him on.


This morning (after I had taken pictures of this project in dizzy light) the sun came out for some minutes and I shot an image of my woodland scenery in full sunlight...which makes the layers and shades pop!


What I love with shadow boxes or little stages of toy theatres is that they reveal more detail when being looked at from various angles:


This creates a special depth that draws you right into this enchanted realm on its own, doesn't it?


I had a wonderful time drawing the bark and the leaves and layering my finished stages to create this tiny piece of woodland. I haven't drawn for ages and this reminded me to start drawing again. Well, we'll see.... :)


I hope you like this piece. This dies set is such a lovely design! Especially this scene stole my heart right away!  Can't wait to do a variation of it! ;)

Hugs and happy crafting,
Claudia xxx


I enter this project to the following challenge/s:

The Artistic Stamper - Christmas is Coming
(the "Joy" and "Happy Holidays" quotes are stamped)

Craft Room Challenge - Anything 3D 
(which is the perfect challenge theme for a shadow box lover like I am. Thank you! ;)

Dies R Us Challenge Blog - Anything Goes - Christmas

Moo Mania & More - Trees
(their challenges are open to other formats than Moos as well....yay! Thanks for the information, Susie ;)

Monday 17 November 2014

Interfering with the Bling! (a DecoArt media Christmas Tree Ornament Tutorial)

Servus and welcome to some Christmas crafting today.
I am not much of a Christmas crafter to be honest...don't know why because I definitely enjoy looking at gorgeous X-mas decorations done by others. The only time when I really did a lot of seasonal decorating and crafting was during pregnancy and the year after (so I "blame" it on the hormones mainly...lol).

My husband and I still laugh about that day back in that very veeeeery hot summer 2003 when (highly advanced in pregnancy) I fled the constant 89 °F (32 °C) of our flat and went to his office (which had the most wonderful air con) to spend the whole day there creating Christmas tree ornaments in the middle of August. (I guess his colleagues still laugh about it too...giggle. But I still have those ornaments and they are very special to me).

So when I created the Christmas tree ornament I want to share with you today it brought back sweet memories of a very special time in my life ;)

DecoArt will be doing a Christmas DecoArt Blog Round Up on November 19th in their newsletter...so there will be loads of yummy mixed media Christmas crafting tutorials to check out! Make sure you don't miss this! To sign up for their newsletter simply go HERE.


I decided to join in and play a little with the awesome DecoArt media "Interference" colours as they look especially great on "moving" objects. So it seemed perfect for my tree ornament, which would be seen from a lot of different angles!


To create this ornament I used:

DecoArt:
- media fluid acrylics "Interference Green" and "Translucent White"
- Americana "Deep Burgundy"
- Decou-Page (gloss or matte)
- Metallic Lustre "Gold Rush"

Other materials:
- heavy black card
- Spellbinders embossing folder "Mediterranean Medallion"
- die cutting/embossing machine
- thin gold wire
- beads
-white paper
- scissors, pencil, craft knife, ruler, brush, water, soft cloth, cloths pins


Here we go:


1. Fold a sheet of heavy white printer paper in half and sketch half the ornament's shape until content. Cut out and unfold. This way you get a perfect symmetrical shape.


2. On a piece of black cardstock trace the ornament's shape six times and cut out.


You could do eight pieces as well, but then I'd recommend using a ligher cardstock. Otherwise assembling the ornament will become rather tricky.


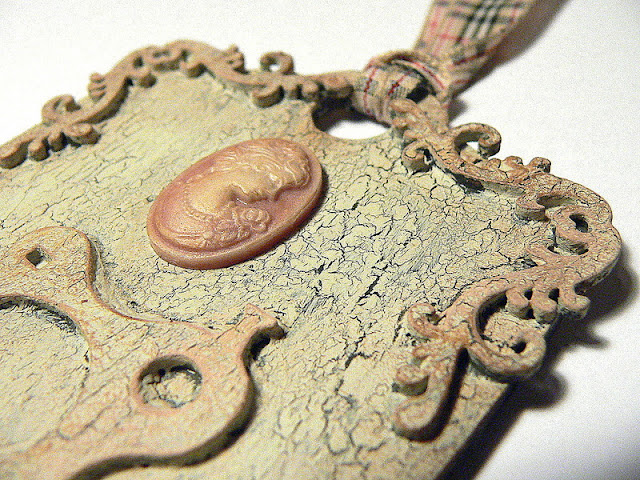
3. Emboss the six pieces with some textural pattern. I used the fab Spellbinders "Mediterranean Medallion" embossing folder as it has swirls and flourishes, which add to a festive look.


4. On their backs lightly score your ornament pieces along their middle line with a craft knife using as little pressure as possible (otherwise you might cut right through). This will help fold them neatly.


5. Give the prepared pieces a wash of Americana "Deep Burgundy". Don't cover them evenly. We want the black card to show through with some spots.


6. Next give them a wash with diluted media "Interference Green". See to it that you leave puddles of the wash with some areas. Let dry naturally.


If you want your ornament to have the real excessive "interference bling" skip step 7 and move directly to step 8.


7. I wanted to tone down the quite heavy "interfering" of the Interference Green, so I gave my pieces a wash of generously diluted media "Translucent White". Again I saw to it that there were puddles of paint left in some spots, which I let airdry. This helped create a weathered look.


8. Then I highlighted some of the raised areas with "Gold Rush" metallic lustre. I prefer using my fingertip to apply the metallic lustres, but you can use a piece of cut'n dry foam instead.


Take some soft cloth and buff the metallic lustre to a shine.


9. Flip your painted and "lustred" ornament pieces to the other side and paint the edges with the metallic lustre. To do so simply spray a little water on the surface of the metallic lustre in the container and use a soft brush.


10. Glue the pieces together in twos and let dry. I used Decou-page as it dries really fast. You can use either the gloss or the matte version. Fix pieces with cloths pins while the glue dries. Press and flatten the edges of the ornament's parts with your fingers.


11. When dry glue two of the three pairs together and set aside to dry. We have to add a hanging device first before we assemble the whole ornament!


12. Take some thin gold wire and beads and create the hanging device.


The beads at the bottom of the ornament will hold everything in place.


13. Insert the cut to size wire and create a loop at the top of the ornament:


14. Now you can fix the final piece of the ornament to the other pieces! :)


You're done! :)


To show you the amazing effect of the Interference Colours from the DecoArt media range I took two images of the same "wing" of my ornament:


At this angle you can see the Deep Burgundy showing through and the Interference Green giving a kind of patina effect. 
And then I held it at a just slightly different angle and took another photograph of the same wing...


...which makes it look all green and shiny! 
Just imagine how awesome your ornaments will look when swinging gently, moved by the warm air from the candles on the tree! 


This effect is so stunning! (but sooo hard to capture in a photograph *lol). 


I hope you liked my "festive" tutorial and have a lot of fun creating your own Christmas decorations!

Hugs and happy advent crafting,
Claudia 
xxx